

Soar into the captivating world of aerial photography by mastering the basics of drone flight in Ontario’s stunning landscapes. Whether hovering above crystalline lakes or capturing the vibrant fall colors, drone photography opens up entirely new perspectives of our natural world. Before launching your first flight at any of the best drone spots in Ontario, understand that successful drone photography combines technical skill, creative vision, and responsible flying practices.
Your journey into aerial photography starts with learning essential flight controls, understanding weather conditions, and familiarizing yourself with local regulations. Modern drones make it easier than ever to capture breathtaking shots, but mastering the fundamentals ensures both stunning results and safe operations. From sweeping panoramas to dynamic action sequences, drone photography offers endless creative possibilities for both hobbyists and aspiring professionals.
This guide will walk you through everything you need to know about getting started with drone photography, from choosing the right equipment to mastering basic flight maneuvers and composition techniques. Let’s take to the skies and discover how to capture Ontario’s natural beauty from above, all while respecting our parks and wildlife.
Legal Requirements and Park Regulations
Drone Registration and Licensing
Before taking flight with your drone in Ontario, you’ll need to make sure you’re following Transport Canada’s regulations. For most recreational drones weighing between 250g and 25kg, registration is mandatory and costs just $5. The process is straightforward – visit Transport Canada’s website, create an account, and register your drone to get a unique identification number that must be visible on your aircraft.
But wait, there’s more! You’ll also need to pass a basic pilot certification test, which covers essential knowledge about airspace rules, flight safety, and weather considerations. The basic exam costs $10, and once you pass, your certificate is valid for two years. Pro tip: Study the practice questions carefully – they’re incredibly similar to what you’ll see on the actual test!
For park photography specifically, remember that many Ontario Parks have additional drone restrictions. Always check the park’s website or contact the park office before your visit to confirm if drone photography is permitted. Some parks may require special permits or have designated areas for drone operations.
Park-Specific Rules and No-Fly Zones
Before launching your drone in Ontario’s most scenic parks, it’s crucial to understand where and when you can fly. Most Ontario Parks require drone operators to obtain a Special Flight Operations Certificate (SFOC) before any aerial photography. Currently, recreational drone flying is prohibited in all provincial parks unless specifically authorized.
Key no-fly zones include campgrounds, beaches, visitor centers, and areas with sensitive wildlife habitats. Some parks may have designated drone zones during specific seasons – always check with park staff before your visit. Remember to maintain a minimum distance of 30 meters from people, buildings, and wildlife.
Pro tip: Download the NAV CANADA drone app to check for temporary flight restrictions and updated regulations. During peak seasons (July-August), restrictions might be stricter due to increased visitor traffic. Consider visiting during shoulder seasons (spring/fall) when obtaining permits might be easier and there are fewer visitors to navigate around.
Always respect quiet hours (typically 10 PM to 7 AM) and keep your drone within visual line of sight at all times.
Essential Drone Photography Equipment
Best Drones for Park Photography
When it comes to capturing stunning park vistas from above, you don’t need to break the bank to get started. For beginners, the DJI Mini 2 is a fantastic choice, weighing just under 249 grams – perfect for complying with basic drone regulations while delivering impressive 4K video and 12MP photos. Its compact size makes it ideal for hiking trails, and the 31-minute flight time gives you plenty of opportunities to perfect your shots.
Another excellent option is the DJI Air 2S, which offers a larger 1-inch sensor for enhanced image quality, especially during golden hour shots of Ontario’s stunning landscapes. While slightly pricier, its advanced obstacle avoidance features provide extra confidence when navigating through park environments.
For those on a tighter budget, the Holy Stone HS720E delivers reliable performance with a 4K camera and GPS-assisted flight features at a more accessible price point. Its 26-minute flight time and stable hovering capabilities make it great for practicing composition techniques.
Remember to choose a drone with Return-to-Home functionality – essential for safety in vast park spaces. Also, look for models with beginner-friendly flight modes and wind resistance ratings suitable for Ontario’s varying weather conditions. Pro tip: Consider getting a drone with replaceable batteries to extend your shooting time during those picture-perfect sunset moments.

Must-Have Accessories
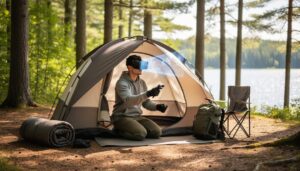
To ensure you’re ready for your drone photography adventure in Ontario’s parks, pack these essential accessories. A set of spare batteries is absolutely crucial – cold weather can drain power quickly, and you don’t want to miss that perfect sunset shot! Keep them in a protective case and always charge them the night before.
A landing pad is another must-have, protecting your drone from grass, dirt, and moisture during takeoff and landing. Pro tip: opt for a bright-colored pad to make it easily visible from above.
Don’t forget your lens cleaning kit – dust and fingerprints can ruin otherwise perfect shots. Pack microfiber cloths and cleaning solution specifically designed for drone cameras. A sturdy carrying case with proper padding will protect your investment during transport and hiking.
Memory cards are vital – bring at least two high-speed SD cards with plenty of storage. Finally, neutral density (ND) filters are game-changers for shooting in bright conditions, helping you capture those silky-smooth water effects and dramatic skyscapes that make Ontario’s parks so photogenic.
Remember to pack everything in a weather-resistant backpack, keeping your gear safe and your hands free for the hike to your shooting location.
Capturing the Perfect Shot
Camera Settings and Techniques
Getting the perfect drone shot starts with mastering your camera settings. For beginners, I recommend starting in Auto mode while you get comfortable with flying, then gradually exploring manual settings for more creative control.
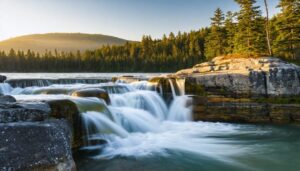
The three key settings to focus on are ISO, shutter speed, and aperture. Keep your ISO as low as possible (usually 100-400) for the clearest images. For most daylight shots in Ontario parks, a shutter speed of 1/500 or faster will ensure sharp images, especially when capturing our magnificent waterfalls or wildlife in motion.
One of my favorite techniques is to shoot during the “golden hour” – just after sunrise or before sunset – when the light is soft and warm, perfect for capturing the stunning colors of our provincial parks. Remember to always shoot in RAW format for better editing flexibility later.
For stable footage, use the drone’s built-in intelligent flight modes. The orbit mode is perfect for capturing those sweeping shots of Ontario’s landscapes, while tracking modes work great for following hiking trails or canoe routes. As you become more comfortable, you can explore advanced drone photography techniques to create more dynamic content.
Pro tip: Always check your camera lens for dust or smudges before takeoff – the crisp Ontario air can carry fine particles that might affect your image quality!
Best Times and Weather Conditions
For the best drone photography results in Ontario Parks, timing is everything. Early morning (just after sunrise) and late afternoon (an hour before sunset) offer the most captivating light conditions, known as the “golden hours.” These times create dramatic shadows and warm, golden tones that enhance your aerial shots.
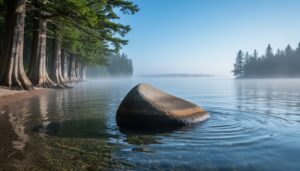
Weather-wise, aim for clear or partly cloudy days with minimal wind – ideally under 20 km/h. Light cloud cover can actually work in your favor by diffusing harsh sunlight and preventing strong shadows. However, avoid flying in fog, rain, or snow, as these conditions can damage your drone and reduce visibility.
Summer and fall are particularly rewarding seasons for drone photography in Ontario Parks. Summer mornings often provide stable air conditions and clear skies, while fall offers spectacular color contrasts with the changing foliage. Winter can also be magical, but remember that cold temperatures significantly reduce battery life, so pack extra batteries and keep them warm.
Pro tip: Check local weather apps for wind conditions at different altitudes, as they can vary significantly from ground level. Always monitor the weather forecast before and during your flight sessions.
Composition Tips for Park Landscapes
When capturing park landscapes from above, the key is to find compelling patterns and leading lines that naturally draw the viewer’s eye. Look for winding trails, meandering rivers, or tree-lined paths that create natural flow in your composition. Early morning and late afternoon provide the best lighting conditions, casting long shadows that add depth and drama to your aerial shots.
Consider the rule of thirds when framing your park scenes – position key elements like lakes, clearings, or notable landmarks at the intersection points of your grid. For more dynamic shots, try shooting at a slight angle rather than perfectly overhead. This perspective often reveals interesting textures and layers in the landscape.
Explore perfect nature photography locations where distinct seasonal changes create stunning visual contrasts. Capture fall foliage from above for a patchwork of colors, or fresh snow for minimalist winter compositions.
Remember to vary your altitude – flying higher can reveal grand patterns in the landscape, while lower flights highlight intimate details of forest canopies or meadow textures. Just maintain a respectful distance from wildlife and other park visitors while getting your perfect shot.

Safety and Environmental Considerations
Wildlife Protection Guidelines
When capturing Ontario’s magnificent wildlife through your drone lens, it’s crucial to prioritize the well-being of our animal friends. Always maintain a respectful distance of at least 50 meters from any wildlife to prevent causing stress or altering their natural behavior. Birds are particularly sensitive to drone presence, so avoid flying during nesting seasons and never hover directly above them.
Keep your drone at a higher altitude when photographing larger animals like moose or deer, as the buzzing sound can startle them. If you notice signs of distress – such as animals fleeing, looking up repeatedly, or stopping their natural activities – immediately move your drone away and find a different subject to photograph.
For the best wildlife shots without disruption, try flying during early morning or late afternoon when animals are naturally more active. Use your drone’s zoom capabilities rather than flying closer, and always plan your flight path to avoid known wildlife habitats.
Remember, great wildlife photography requires patience and respect. Sometimes, the best approach is simply watching and waiting for the perfect moment when animals are comfortable with your presence. Your stunning shots should never come at the expense of wildlife welfare.

Weather Safety and Emergency Procedures
When it comes to drone photography, Mother Nature can be your best friend or your biggest challenge. Always check the weather forecast before your flight, and avoid flying in rain, snow, or winds exceeding 20 km/h. Remember, even light precipitation can damage your drone’s electrical components.
Keep an eye on your drone’s battery level and always land when it reaches 30% – this gives you a safety buffer for unexpected situations. If you notice strong wind gusts, land immediately and wait for conditions to improve. Flying in cold weather? Your battery life will be significantly shorter, so pack extras and keep them warm in an insulated bag.
In case of emergency, familiarize yourself with your drone’s “Return to Home” function before taking off. If you lose visual contact or experience signal interference, this feature can be a lifesaver. Always maintain a clear landing zone and have a backup landing spot identified.
Pro tip: Create a pre-flight checklist that includes weather conditions, battery levels, and emergency procedures. I always keep a small weather meter in my drone bag – it’s helped me avoid many risky situations and make better decisions about when to fly and when to stay grounded.
Drone photography opens up a world of stunning possibilities, but remember that with great power comes great responsibility. As you embark on your aerial photography journey, always prioritize safety, respect local regulations, and be mindful of wildlife and other park visitors. Keep your drone in sight, monitor weather conditions, and maintain your equipment properly. The key to success lies in practice, patience, and understanding your equipment’s capabilities. Start with basic shots and gradually work your way up to more complex compositions. By following these guidelines and embracing a responsible approach to drone photography, you’ll not only capture breathtaking images but also help preserve the natural beauty of our parks for future generations to enjoy. Happy flying, and remember to share your aerial adventures while inspiring others to explore the skies responsibly!


+ There are no comments
Add yours