

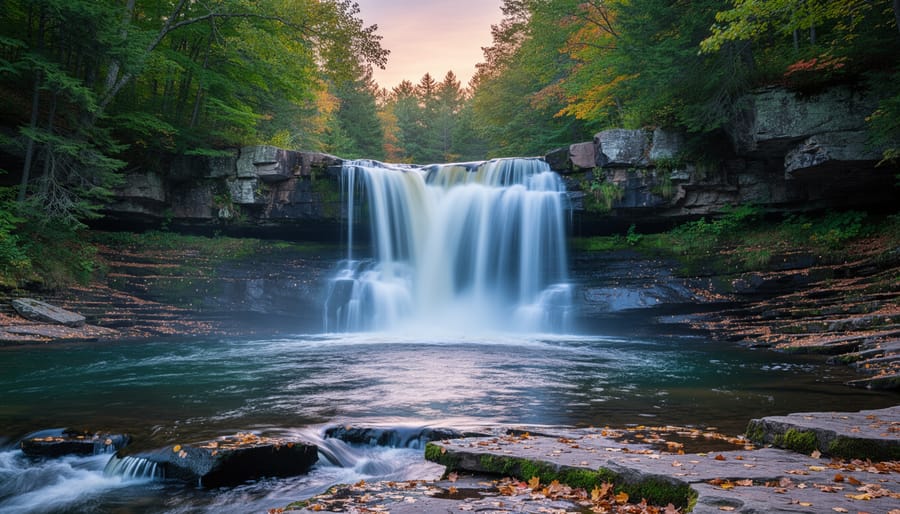
Long exposure landscape photography transforms ordinary Ontario scenes into ethereal dreamscapes—think silky waterfalls, glassy lakes, and clouds stretched across endless skies. This technique uses shutter speeds ranging from one second to several minutes, blurring motion while keeping stationary elements sharp. The result? Images that capture time itself, revealing patterns invisible to the naked eye.
I discovered this technique during a foggy morning at Algonquin Park, watching my camera turn choppy water into liquid glass over a 30-second exposure. That single image changed how I see landscapes entirely.
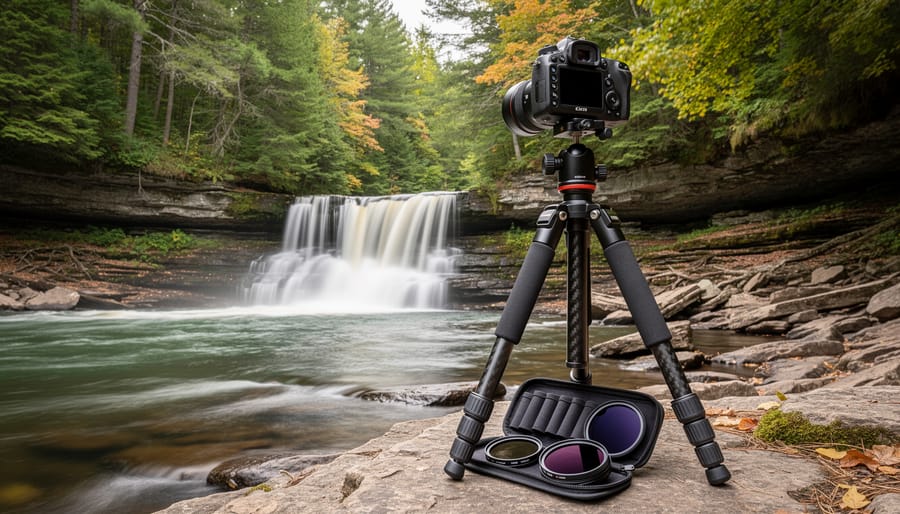
Getting started requires three essentials: a sturdy tripod to eliminate camera shake, neutral density filters to block light for daytime long exposures, and a remote shutter release to prevent vibration. Most beginners assume you need expensive gear, but even entry-level DSLRs and mirrorless cameras handle long exposures beautifully when mounted securely.
Ontario’s provincial parks offer exceptional locations for practicing this craft. Dramatic waterfalls, rocky shorelines, and expansive lake views provide perfect subjects for experimentation. The changing seasons add complexity—autumn mist creates moody atmospheres, while winter ice formations offer unique foreground interest.
This guide walks you through equipment selection, camera settings, composition strategies, and insider location recommendations across Ontario’s most photogenic parks. Whether you’re capturing your first 10-second exposure or refining advanced techniques, you’ll find practical advice tailored to our province’s diverse landscapes. The magic happens when technical knowledge meets creative vision—and Ontario provides the stunning canvas.
What Makes Long Exposure Landscape Photography So Mesmerizing
Long exposure photography might sound technical, but the concept is beautifully simple: you leave your camera’s shutter open longer than usual, letting it capture movement over time instead of freezing a single moment. Think of it as painting with time itself. While a typical snapshot might capture a fraction of a second, long exposures can last anywhere from a few seconds to several minutes, transforming familiar Ontario landscapes into something almost otherworldly.
I’ll never forget the first time I tried this technique at Elora Gorge. I watched the rushing water tumble over rocks, all chaos and white foam. But when I looked at my camera’s preview screen after a 30-second exposure, the water had become silky smooth, almost ethereal, like flowing milk draped over the limestone. It was the same waterfall, but completely transformed.
Here’s where the magic happens. That choppy lake you see on a breezy afternoon? A long exposure turns those irritating waves into a glassy, mirror-like surface that reflects the sky perfectly. Clouds racing overhead during a storm become dramatic streaks painted across the sky, showing their journey rather than their static position. If you’re shooting near roads at twilight, car headlights become gorgeous ribbons of red and white light threading through your landscape.
The transformation really is dramatic. Picture the shoreline at Killarney Provincial Park on a windy day, waves crashing against pink granite rocks. Capture that with a long exposure, and suddenly those aggressive waves become a soft, dreamy mist hugging the shoreline. The rocks remain sharp and detailed, but everything that moved during your exposure gets smoothed out, creating this stunning contrast between the static and the fluid.
This technique doesn’t require exotic locations. Even familiar scenes near your home can become extraordinary when time becomes your creative tool.
Essential Gear You’ll Need (And What You Can Skip)
The Must-Haves
Let me share the essentials that’ll transform your long exposure shots from “nice try” to “wow, how’d you do that?” Trust me, I learned these lessons the hard way during a windy evening at Lake Superior’s shoreline.
First up, your tripod. This isn’t the time for that lightweight travel tripod you grabbed on sale. You need something seriously sturdy that won’t budge during those 30-second exposures. Look for carbon fiber if you’re hiking Ontario’s trails regularly, as it balances weight with stability. Here’s an insider tip: hang your camera bag from the center column hook for extra weight on breezy days.
Next, neutral density filters are your new best friends. Think of them as sunglasses for your camera, blocking light so you can use those dreamy long shutter speeds even in daylight. I recommend starting with a 6-stop and a 10-stop ND filter. The 6-stop works beautifully for those silky waterfalls at places like Webster’s Falls, while the 10-stop creates that ethereal mist effect on Lake Ontario during golden hour.
Finally, grab a remote shutter release or use your camera’s timer function. Even the gentlest finger press creates vibration, and we’re not ruining a perfect composition after hiking two kilometers into the backcountry. Cable releases are affordable and foolproof, though wireless options give you more creative freedom for self-portraits against those stunning Ontario sunsets.
Nice-to-Have Extras
While you can absolutely create stunning long exposure landscapes with just your camera, tripod, and ND filters, a few extra items can make your adventures in Ontario’s parks much more enjoyable and successful.
A quality filter holder system might seem like a luxury at first, but trust me, after fumbling with screw-on filters during golden hour while mosquitoes circle your head, you’ll appreciate how quickly you can swap filters. Look for systems made from recycled materials—several companies now offer eco-conscious options that work beautifully.
Pack a microfiber lens cloth or two. Ontario’s weather can be unpredictable, and morning mist or unexpected drizzle can leave water spots on your filters and lens. I keep one in my camera bag and another in my jacket pocket at all times.
A headlamp with a red light setting is invaluable for those pre-dawn shoots at places like Killarney Provincial Park. The red light preserves your night vision while you’re setting up, and it’s less disruptive to wildlife. Choose rechargeable models to reduce battery waste.
Consider bringing a small, packable rain cover for your camera bag. Even if rain isn’t forecasted, protecting your gear from sudden showers or splashing waterfalls is smart. Many outdoor companies now make covers from recycled materials.
Finally, a comfortable, reusable water bottle and some snacks in reusable containers keep you energized during long shoots. Remember, leave no trace principles apply to photographers too—pack out everything you bring in, keeping Ontario’s beautiful landscapes pristine for everyone.
Ontario’s Best Parks for Long Exposure Photography
Waterfall Wonders: Algonquin and Beyond
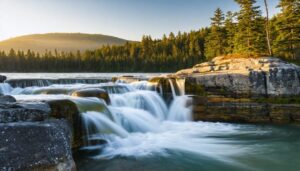
Algonquin Provincial Park steals the spotlight for waterfall photography, and for good reason. High Falls Trail (roughly 10 kilometres round trip) rewards your effort with a stunning two-tiered cascade perfect for long exposure magic. I’d recommend visiting in late spring when snowmelt pumps up the volume, creating that dreamy, misty effect we all chase. The trail can get muddy, so wear proper boots and pack your camera gear in a waterproof bag.
For composition, position yourself at the base lookout and use the surrounding rocks as natural leading lines. A shutter speed between 1-4 seconds typically creates that silky water effect without overexposing the scene. Don’t forget to shoot from multiple angles – sometimes the smaller cascades along the trail offer more intimate, unique perspectives than the main attraction.
Beyond Algonquin, Hilton Falls in Milton deserves your attention. This accessible 10-metre ribbon waterfall freezes beautifully in winter, offering a completely different long exposure opportunity. The Conservation Area’s Bruce Trail section leads you right to the falls in just 20 minutes from the parking lot, making it perfect for quick evening shoots during golden hour.
Here’s an insider tip: arrive at dawn during weekdays to avoid crowds in your frame. Nothing ruins a long exposure faster than unexpected hikers wandering through your carefully composed shot! Also, consider the eco-friendly approach of staying on designated viewing platforms – they’re positioned at optimal angles anyway, and you’ll protect the delicate vegetation surrounding these natural wonders.
Lakeside Serenity: Capturing Misty Mornings
There’s something magical about standing at the edge of a glassy lake as the world slowly wakes up. I’ve spent countless mornings waiting in the pre-dawn darkness, thermos in hand, watching mist dance across still waters—and let me tell you, the payoff is absolutely worth the early alarm.
Ontario’s pristine lakes offer incredible opportunities for ethereal long exposure shots, especially during those golden hours when light and water perform their daily dance. Algonquin Park’s countless lakes are particularly stunning, with morning mist rising like ghosts across the surface. Killarney Provincial Park offers that iconic Canadian Shield backdrop reflected in mirror-like waters that’ll make your Instagram followers weep with envy.
Here’s my insider secret for finding calm conditions: check wind forecasts obsessively the night before. You want winds under 5 km/h for that perfect glass-like surface. Dawn typically offers the calmest conditions before daytime heating stirs things up. I’ve also found that smaller, sheltered lakes surrounded by trees provide better protection than vast open waters.
Timing is everything. Arrive at least 45 minutes before sunrise to set up without rushing. This gives you time to scout compositions and adjust as the light changes. During autumn, the mist is particularly dramatic as warm water meets cool air—September and early October are absolute gold.
One eco-friendly tip: stick to established shorelines and viewing areas to protect fragile aquatic ecosystems. Your stunning photos shouldn’t come at nature’s expense. Pack out everything you bring, and consider using a headlamp with red light mode to minimize disruption to wildlife during those dark pre-dawn setups.

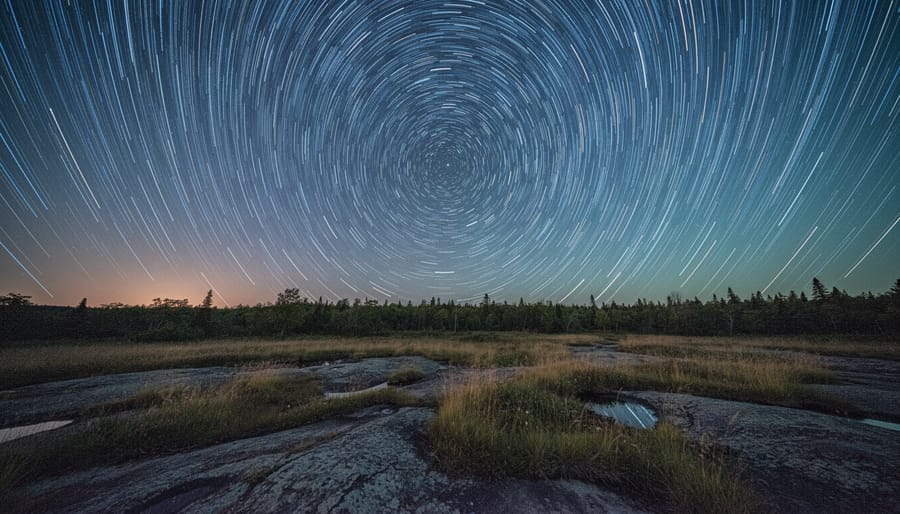
Night Sky Spectacles: Dark Sky Preserves
If you’ve ever gazed up at a truly dark night sky, you know it’s an experience that stays with you forever. For long exposure photographers, Ontario’s dark sky preserves offer some of the most spectacular celestial shows you’ll find anywhere in North America.
Torrance Barrens, located in Muskoka, holds the distinction of being one of Canada’s first permanent dark sky preserves. On a clear night here, you can see the Milky Way stretching overhead like a cosmic river. The rocky terrain provides interesting foreground elements for your star trail compositions, and the site is accessible year-round with parking available.
Gordon’s Park on Manitoulin Island offers another fantastic option, especially if you’re planning an overnight adventure. They have camping facilities designed specifically for stargazers and photographers, with minimal lighting to preserve the darkness. I’ve spent nights there capturing the stars reflecting off Lake Huron, and the combination is truly magical.
Here’s an insider tip: check moon phase calendars before your trip. New moon periods provide the darkest skies for the most dramatic star trails and Milky Way shots. Also, dress warmer than you think necessary. Even summer nights get chilly during those two-hour exposures!
Remember to practice Leave No Trace principles at these sensitive sites. Use red headlamps to preserve both your night vision and the experience for fellow stargazers, and stick to designated areas to protect the fragile ecosystems beneath those stunning skies.
Camera Settings and Techniques That Actually Work
Daytime Long Exposures
Shooting in bright daylight requires neutral density (ND) filters to tame all that light and achieve those dreamy, silky effects. Think of ND filters as sunglasses for your camera—they block light without changing colors. I learned this the hard way at Niagara Falls when my first waterfall shots came out completely blown out!
For most daytime long exposures at Ontario’s waterfalls and beaches, a 6-stop or 10-stop ND filter works beautifully. The 6-stop is perfect for overcast days or shaded forest waterfalls, while the 10-stop handles full sunshine. Here’s a simple trick for exposure calculations: without the filter, meter your scene in manual mode. Let’s say you get 1/250 second at f/8. Add a 10-stop filter, and you’ll need to increase your exposure by 10 stops—that’s roughly 4 seconds. Most smartphones have ND calculator apps that do this math instantly.
Start with ISO 100, aperture around f/11 for sharpness, and let your shutter speed extend into seconds. At beaches, this transforms crashing waves into ethereal mist. At waterfalls like those in Algonquin, you’ll capture that silky cotton-candy flow everyone loves. Experiment with different exposure lengths—2 seconds versus 30 seconds creates dramatically different moods.
Golden Hour and Blue Hour Magic
There’s something almost spiritual about watching Ontario’s landscapes transform during golden hour and blue hour. That magical hour after sunrise and before sunset bathes everything in warm, honeyed light that makes even ordinary scenes extraordinary, while blue hour’s cool twilight creates moody, ethereal atmospheres perfect for long exposures.
Here’s an insider tip I learned the hard way: golden hour isn’t actually an hour long, especially during Ontario’s seasonal extremes. In December, you might have just 20 minutes of that gorgeous light, while summer evenings can give you nearly 90 minutes to work with. Download a golden hour calculator app and arrive at least 30 minutes early to scout compositions and set up your gear.
For dawn shoots in spring and fall, be prepared for rapidly changing light. I bracket my exposures heavily during these times because the difference between your first and last shot can be dramatic. Start with longer exposures during blue hour, when you can capture those silky water movements and streaking clouds, then gradually reduce your exposure time as the sun brightens.
Ontario winters offer a hidden advantage: shorter days mean golden and blue hour happen at more civilized times. You won’t need that 4:30 AM alarm in January! The snow also acts as a natural reflector, adding beautiful fill light to your scenes and extending that golden glow.
After Dark: Stars and Light Trails
There’s something magical about watching star trails arc across Ontario’s winter sky while your camera captures what our eyes can’t see alone. Night photography pushes your long exposure skills to new limits, but the rewards are absolutely worth bundling up for.
Start with these settings: ISO 1600-3200, aperture wide open at f/2.8 or lower if possible, and exposures of 15-30 seconds for pin-sharp stars (or several minutes for trails). Manual focus is essential since autofocus struggles in darkness. Here’s my go-to trick: switch to live view, zoom in on the brightest star you can find, and carefully adjust your focus ring until it becomes a tight point of light.
Those frigid Ontario nights present real challenges. Your battery drains faster in cold weather, so keep spares warm in an inside pocket. I learned this the hard way during a February shoot at Killarney! Condensation forms when bringing cold gear indoors, so seal your camera in a plastic bag before heading in.
Dark sky preserves like Torrance Barrens offer spectacular night stargazing opportunities with minimal light pollution. Dress in layers, bring hand warmers, and give yourself time to experiment. The results will make those chilly fingers completely worthwhile.
Composition Tips for Stunning Long Exposure Landscapes
Picture yourself standing at Bon Echo Provincial Park’s shoreline just before sunrise, the iconic Mazinaw Rock towering ahead. Here’s where the magic happens: instead of centering that massive cliff face, try positioning it along the right third of your frame. This gives your long exposure shot breathing room, letting the silky water flow from foreground to background, drawing viewers straight into your scene.
The rule of thirds becomes your best friend when shooting long exposures in Ontario’s landscapes. I learned this the hard way at Arrowhead Provincial Park, where I initially centered everything and ended up with flat, uninspiring images. Now, I imagine my frame divided into nine sections and place key elements like that weathered dock or distinctive tree along those intersection points. The results? Instantly more dynamic.
Leading lines work wonders with long exposure techniques. At Presqu’ile Provincial Park, the old boardwalk creates a natural pathway that guides eyes through misty morning waters toward the lighthouse. Rivers become silvery ribbons pointing toward distant ridgelines. Even windswept grasses in the foreground add directional flow that complements your smoothed-out water or clouds.
Don’t forget about foreground interest. This is something I wish I’d understood earlier in my photography journey. Those textured rocks along Lake Superior’s shore or gnarled tree roots at Killarney Provincial Park give your images depth and scale. They anchor your composition while that dreamy, motion-blurred background provides context.
One insider tip: scout locations during daylight first. Note where interesting elements align, where the sun rises or sets, and where you’ll position your tripod. I keep location notes on my phone with composition ideas for return visits. At Algonquin’s Canoe Lake, I marked three different vantage points before returning for golden hour, and that preparation paid off beautifully.
Finally, embrace negative space. Ontario’s big skies deserve room to breathe in your frame, especially when you’re capturing dramatic cloud movement over Georgian Bay or Sandbanks’ dunes.
Insider Tips for Success in Ontario Parks
Planning Your Photo Adventure
Before you pack your gear and head out, a little homework goes a long way toward capturing those dreamy long exposure shots. I always start by scouting locations using Google Maps and park websites—look for waterfalls, shorelines, or spots with moving clouds for dramatic skies. Ontario Parks’ official websites often feature trail maps and highlight photographic hotspots, saving you valuable golden hour minutes.
Timing is everything. Check weather forecasts, sunset times, and moon phases (a crescent moon won’t overpower your twilight shots). Apps like PhotoPills help visualize sun positions and predict ideal shooting windows. I’ve learned the hard way that arriving an hour early beats missing that perfect light by five minutes.
Always review park regulations before visiting. Some parks restrict tripod use in certain areas or require photography permits for commercial shoots. Respect trail closures and wildlife protection zones—these rules exist for good reasons.
Here’s where we can all make a difference: practice Leave No Trace principles. Stay on designated trails, pack out everything you bring in, and avoid trampling vegetation for “that perfect angle.” Use existing paths to shorelines and never disturb wildlife for a shot. Our pristine Ontario landscapes deserve protection so future photographers can enjoy them too. Responsible photography ensures these magical places remain unspoiled.
Dealing with Ontario’s Unpredictable Weather
If you’ve spent any time shooting outdoors in Ontario, you know Mother Nature doesn’t always cooperate with your photography plans. I’ve learned this the hard way more times than I’d like to admit!
Rain is probably your biggest concern during long exposures. I always keep microfiber cloths in easy-reach pockets to wipe down my lens between shots, and a rain sleeve has saved my camera countless times at places like Niagara Falls where mist is constant. For unexpected downpours, even a large plastic bag with a hole cut for the lens works in a pinch. Just secure it with an elastic band around the lens barrel.
Cold weather brings its own challenges. Your batteries drain faster in winter, so keep spares warm in an inside pocket close to your body. I learned this during a freezing sunrise shoot at Sleeping Giant Provincial Park when my camera died after just three shots. Now I rotate batteries to keep them functional.
Humidity and condensation can fog your lens when moving between temperatures. Let your gear adjust gradually by keeping it in your camera bag when transitioning from cold to warm environments. This thirty-minute patience has prevented many ruined shots for me. Consider using silica gel packets in your bag to absorb excess moisture, especially during Ontario’s humid summers.
Common Mistakes and How to Avoid Them
We’ve all been there – you arrive at a stunning Ontario waterfall at golden hour, set up your tripod with excitement, and later discover your images are either blown out, blurry, or just plain disappointing. Don’t worry, these hiccups are part of the learning curve, and I promise they’re easy to fix once you know what to watch for.
The biggest mistake I see beginners make is forgetting to use a remote shutter release or the camera’s timer. Even the gentlest press of the shutter button can introduce shake during those dreamy 30-second exposures. Your camera’s built-in 2-second timer is your best friend here, and it’s completely free to use.
Another common pitfall is misjudging the light. That bright midday sun you think you’re blocking with your ND filter? It’s often still too intense, resulting in overexposed skies even with a 10-stop filter. Start your long exposure adventures during the golden hours or on overcast days when the light is naturally softer and more forgiving.
Many photographers also underestimate wind. You’ll set up your shot, start your exposure, and a gust will shake your tripod just enough to blur the entire frame. Check the weather before heading out, and if it’s breezy, weigh down your tripod with your camera bag or find natural windbreaks like rock formations.
Here’s an insider tip that changed my photography game: always take test shots at normal shutter speeds first. Nail your composition and rough exposure settings before adding the ND filter. It’s so much easier to make adjustments when you can actually see through your viewfinder clearly. Think of it as your roadmap before the real journey begins. With practice and patience, you’ll sidestep these pitfalls and capture those silky waterfalls and dramatic cloudscapes you’re envisioning.
From Long Exposure to Time-Lapse: Taking It Further
Once you’ve mastered the art of freezing motion with long exposures, you’re perfectly positioned to explore the captivating world of time-lapse photography. Think of it as the natural next step in your photography journey. While long exposure condenses time into a single frame, time-lapse expands it across hundreds of frames, creating mesmerizing videos that showcase landscapes transforming before your eyes.
The skills you’ve developed are directly transferable. You already understand how to use neutral density filters to control light, how to work with a sturdy tripod, and most importantly, how to read changing light conditions. Time-lapse simply takes these fundamentals and adds an exciting new dimension. Instead of capturing a 30-second exposure of flowing water, imagine recording the entire sunset over Lake Superior, condensed into a 10-second clip that shows colours dancing across the sky.
Here’s an insider tip: start by capturing time-lapses during the blue hour at your favourite long exposure spots. The gradual transition from day to night creates stunning results, and you’ll already be familiar with the location’s best angles.
Ontario’s provincial parks offer incredible opportunities for time-lapse photography, from star trails wheeling over the backcountry to fog rolling through forested valleys at dawn. The same dramatic landscapes that make your long exposure images shine will elevate your time-lapse work to new heights. Many parks even offer designated Dark Sky areas, perfect for capturing the Milky Way’s slow journey across the night sky.
Ontario’s provincial and national parks are waiting for you, camera in hand and imagination ready. The beauty of long exposure landscape photography is that it’s genuinely accessible to everyone, whether you’ve just unboxed your first camera or you’ve been shooting for years. Start simple: pick one park, bring a tripod, and experiment with those shutter speeds. Try a 30-second exposure of clouds drifting over a lake, or capture the silky flow of a waterfall during the golden hour. Don’t worry about perfection on your first outing.
The magic happens when you combine patience with practice. If you want to accelerate your learning, consider joining one of the many photography workshops offered throughout Ontario’s park system. Remember, every photographer you admire started exactly where you are now.
Ontario’s landscapes offer endless possibilities across all seasons: misty mornings at Killarney, star trails over Algonquin, winter waves frozen in motion along Lake Superior. Pack your gear, embrace the trial and error, and discover how long exposure photography transforms familiar scenes into extraordinary art. Your adventure starts now – which park will you explore first?


+ There are no comments
Add yours