

Master map and compass basics before your first trail – fold your topographic map to show your route section, orient it to magnetic north, and practice taking bearings on landmarks you can see from your trailhead. Ontario’s backcountry demands this foundational skill because cell service disappears fast, and GPS batteries die when you need them most.
Download offline maps of your specific Ontario Parks destination at least 48 hours before departure. Apps like Gaia GPS and Avenza Maps let you cache detailed topographic data, but here’s the insider tip: always verify coordinates against your paper map since digital versions occasionally show outdated trail information or missing portages.
Test your navigation skills on shorter, well-marked trails first. Algonquin Park’s Highland Backpacking Trail or Killarney’s La Cloche Silhouette Trail offer excellent training grounds where you can build confidence with clear landmarks and moderate terrain before tackling more remote routes.
Identify three distinct landscape features before every backcountry trip: a baseline (like a road or lakeshore you can’t cross), an attack point (obvious landmark near your destination), and handrails (linear features like ridges or streams to follow). This mental framework transforms confusing forest into readable terrain.
The difference between an epic adventure and a genuine emergency often comes down to navigation confidence. Whether you’re planning your first overnight trip or your fiftieth, understanding how to read Ontario’s unique landscape – from the Canadian Shield’s granite ridges to thick boreal forests – keeps you safe, reduces environmental impact from wandering off-trail, and lets you truly relax into the wilderness experience.
Why Backcountry Navigation Matters in Ontario Parks
Ontario’s backcountry presents navigation challenges unlike anywhere else in Canada, and honestly, that’s what makes exploring these parks so rewarding. From Algonquin’s seemingly endless maze of interconnected lakes and dense boreal forests to Killarney’s exposed pink granite ridges and La Cloche mountain ranges, each park demands different navigation approaches. The Canadian Shield terrain that dominates much of Ontario means you’ll encounter everything from thick canopy cover that obscures landmarks to wide-open vistas where distances are deceiving.
Here’s what catches most paddlers and hikers off guard: your smartphone becomes a pretty paperweight once you’re more than an hour into the backcountry. Cellular coverage is virtually non-existent in most Ontario parks. Even popular destinations like Algonquin’s interior sites or Killarney’s famous George Lake Loop leave you completely disconnected. While GPS units can still track your location via satellite, you can’t rely on downloading maps or calling for help if something goes wrong.
This is precisely why mastering traditional wilderness safety skills isn’t just recommended, it’s essential. Knowing how to read a topographic map, use a compass, and identify natural landmarks could mean the difference between a memorable adventure and a stressful night lost in the woods.
I’ll never forget my first solo canoe trip on Algonquin’s Tim River. Heavy morning fog rolled in, obscuring everything beyond twenty meters. My phone was useless, but my compass and waterproof map guided me confidently through three portages I couldn’t even see until I was practically standing on them. When the fog lifted around noon, I was exactly where I’d planned to be, setting up camp on a perfect island site. That moment taught me that solid navigation skills don’t just keep you safe, they give you the confidence to embrace Ontario’s backcountry on its own wild terms.
Essential Navigation Tools You’ll Actually Use
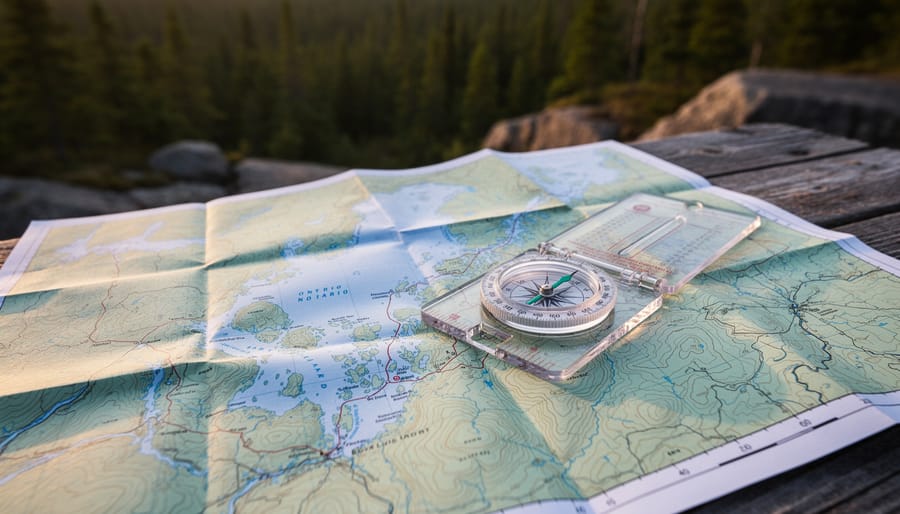
Map and Compass: Your Backcountry Best Friends
Before you venture into Ontario’s wild backcountry, let me share what seasoned paddlers and hikers know: your phone battery will die, your GPS might lose signal, but a good map and compass? They’ll never let you down.
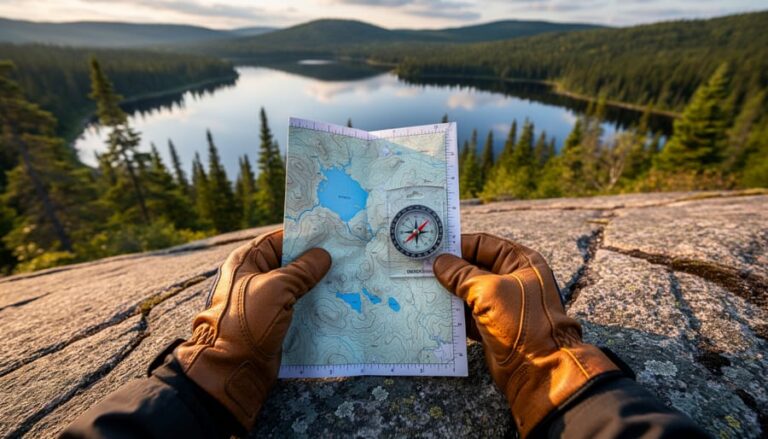
Start with the right topographic map for your chosen Ontario park. The 1:50,000 scale works beautifully for most trips, showing enough detail to identify lakes, portages, and elevation changes without overwhelming you. For larger wilderness areas like Killarney or Algonquin, you might prefer 1:25,000 scale maps that reveal finer trail details. Many Ontario Parks offer dedicated waterproof park maps at their gatehouse, which I always grab as a backup to my standard topo maps.
When choosing a compass, skip the keychain novelties. Invest in a proper baseplate compass with a rotating bezel, clear baseplate with ruler markings, and luminous points for low-light conditions. Brands like Suunto and Silva have served me reliably through countless adventures. Expect to spend around thirty to fifty dollars for quality that lasts decades.
Here’s an insider tip: laminating maps works, but it’s wasteful and creates single-use items. Instead, grab a reusable waterproof map case with a clear window. These eco-friendly pouches protect your maps from rainfall and portage splashes while folding small enough to fit in your PFD pocket. I’ve used the same case for five years across hundreds of kilometers.
Learning traditional navigation skills with these tools might feel old-school, but there’s something deeply satisfying about finding your way using skills humans have relied on for generations. Plus, when everyone else is frantically searching for cell service, you’ll confidently know exactly where you stand.
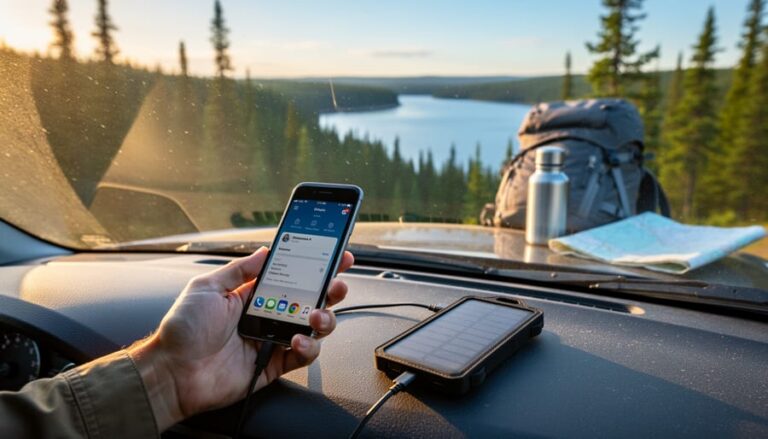
GPS Devices and Smartphone Apps
Let’s be honest: your smartphone can be a lifesaver in the backcountry, but only if you treat it as your backup, not your primary navigation tool. I learned this the hard way during a winter trip in Algonquin when my phone died at -15°C despite showing 60% battery that morning. Cold weather is brutal on electronics, and that’s just one of many reasons why your map and compass skills need to be solid first.
That said, GPS apps are incredibly useful when used wisely. For Ontario’s backcountry, I recommend downloading Gaia GPS or Avenza Maps before you leave home. Both work completely offline once you’ve downloaded the specific park maps you need. The free versions are perfectly adequate for most trips, though I’ve splurged for premium features on longer expeditions. These apps let you track your route, mark waypoints for your campsite or water sources, and verify your position when you’re confident in your traditional navigation.
Here’s my battery conservation game plan: enable airplane mode immediately upon entering the backcountry (you won’t have service anyway), dim your screen to minimum brightness, and only check your GPS when you genuinely need confirmation. Carry a portable power bank in an inside pocket where your body heat keeps it warm, and consider a phone case designed for cold weather if you’re heading out between November and March.
Remember, technology enhances your wilderness experience but should never replace the fundamental skills of reading terrain and using your compass. When your phone works, it’s wonderful. When it doesn’t, you’ll be grateful you packed those traditional tools.
Other Handy Navigation Aids
Beyond your map and compass, a few other tools can really boost your navigation confidence in Ontario’s backcountry. An altimeter watch is fantastic for those vertical challenges in places like Killarney Provincial Park, where tracking elevation changes helps confirm your position on topographic maps. I’ve found mine invaluable when hiking the La Cloche Silhouette Trail, especially when fog rolls in and visibility drops.
Don’t underestimate nature’s own navigation cues either. In Ontario’s mixed forests, moss typically grows thicker on the north side of trees, though this isn’t foolproof. The sun rises in the east and sets in the west, giving you a reliable daytime reference point. At night, locate Polaris, the North Star, by following the pointer stars in the Big Dipper constellation.
Here’s an insider tip: Ontario’s prevailing winds generally blow from west to east, which shapes how trees grow. Look for flagged trees with branches predominantly on one side, pointing away from the wind’s source. These natural signposts have saved me more than once when double-checking my bearing on cloudy days.
Reading Topographic Maps Like a Local
Understanding Contour Lines and Elevation
Imagine you’re looking down at a landscape from above – those squiggly brown lines on your topographic map are actually telling you an incredible story about what the terrain looks like. Each contour line connects points of equal elevation, and here’s the key: when lines are close together, you’re looking at steep terrain, and when they’re spaced far apart, the ground is relatively flat.
Let me give you a real example from Algonquin Park’s Highland Backpacking Trail. When you see contour lines bunched tightly together near Provoking Lake, that’s your map warning you about those challenging climbs that’ll get your heart pumping. The wider spacing along the Booth’s Rock Trail? That’s telling you it’s a gentler walk, perfect for easing into backcountry navigation.
Here’s an insider tip: each contour line represents a specific elevation change, typically 10 meters on most Ontario park maps. Count five lines going upward, and you’ve just climbed 50 meters – roughly the height of a 15-story building!
In Frontenac Provincial Park, practice reading contours on the easier Slide Lake Loop before tackling more complex terrain. Look for V-shaped contours pointing uphill – those indicate valleys or creek beds where you might find water sources. When the V points downhill, you’re looking at a ridge.
The beauty of understanding contours is that you’ll never be surprised by what’s around the next bend. That skill transforms navigation from guesswork into confidence, making your backcountry adventures safer and infinitely more enjoyable.
Identifying Landmarks and Features
Here’s where navigation really comes alive—when you start connecting those squiggly lines on your map to the actual landscape around you. The first time I successfully identified a portage landing from my map while paddling Algonquin’s Magnetawan Lake, I felt like I’d unlocked a superpower.
Start with the big, obvious features. Lakes are your best friends—they’re hard to miss and clearly marked on topographic maps as blue shapes. But here’s an insider tip: look at the shape. That distinctive narrow bay or odd peninsula on your map should match what you’re seeing from your canoe. Islands work the same way, and counting them as you paddle helps confirm your position.
Portage trails appear as dotted lines connecting water bodies, often marked with a “P” and distance in meters on park maps. In real life, watch for worn shoreline paths, canoe rests (wooden racks), or orange markers on trees. Not all portages are created equal—some are Highway 401-smooth, others are root-tangled obstacle courses.
Campsites show up as small tent symbols or red dots. You’ll typically spot cleared areas, fire pits, and thunder boxes (outhouses) from the water. The shoreline often looks more worn where campsites sit.
Trail junctions and elevation changes are trickier but crucial. Those brown contour lines bunching together? That’s a steep hill you’ll actually have to climb. Practice at home by comparing Google Earth satellite views with your topo map—it builds that mental translation skill you’ll rely on when you’re miles from cell service.
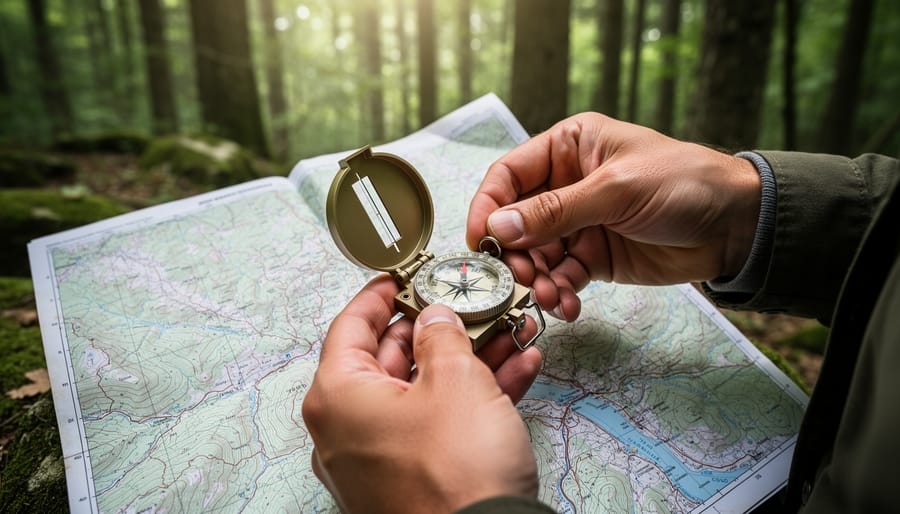
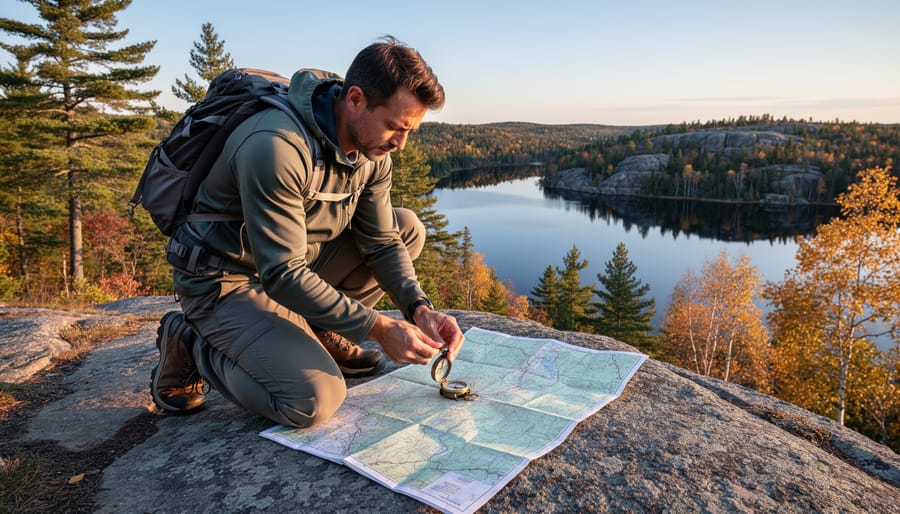
Mastering Your Compass Skills
Taking and Following a Bearing
Once you’ve identified your destination on the map, it’s time to connect the dots between where you are and where you want to be. Start by placing the edge of your compass baseplate along the line between these two points, with the direction-of-travel arrow pointing toward your destination. Now rotate the compass housing until the orienting lines inside align with the north-south grid lines on your map. Double-check that north on the dial matches north on your map – I once hiked an extra hour in Algonquin because I rushed this step!
Here’s where the magic happens. Hold the compass flat at chest level and rotate your entire body until the magnetic needle aligns with the orienting arrow inside the housing. The direction-of-travel arrow now points exactly where you need to go. Pick a distinctive landmark in that direction – a tall white pine, an unusual rock formation, or a gap in the trees – and walk toward it. This is your friend in dense Ontario forests where checking your compass every three steps gets tedious.
When you reach your landmark, stop and take a fresh bearing. This leapfrog technique keeps you on course even when the forest canopy is thick. On longer journeys, count your paces or time your travel to estimate distance covered. If you’re bushwhacking through Killarney’s rugged terrain, expect slower progress than trail hiking and adjust accordingly. A handy insider tip: write your bearing on a piece of tape stuck to your compass so you don’t have to recalculate constantly if you get distracted by wildlife or tricky terrain.
Adjusting for Magnetic Declination
Here’s a navigation reality check: your compass points to magnetic north, but your map shows true north. In Ontario, that difference—called magnetic declination—is roughly 10-12 degrees west, depending on where you are in the province. Ignore it on a day hike and you might end up a few hundred meters off course. No big deal. But on a multi-day backcountry trek? That small error compounds with every kilometer, potentially leading you kilometers away from your intended destination.
Think of declination as a consistent drift that needs correcting. The good news? Adjusting is surprisingly simple. Most quality compasses have a declination adjustment screw that lets you set it once and forget it. Check your topographic map’s legend for the exact declination value for your area—it varies slightly across Ontario’s vast geography. If your compass doesn’t adjust, just add 10-12 degrees to your bearing when following a map direction, or subtract when plotting a compass bearing onto your map.
Here’s an insider tip: write your declination adjustment on a piece of tape stuck to your compass case. When you’re cold, tired, and second-guessing yourself in the backcountry, that little reminder becomes invaluable. Practice this adjustment at home before heading out—it’ll become second nature.
Practicing Before You Go
Before you venture into Ontario’s remote backcountry, take your compass and map to a local park for some low-stakes practice. I learned this lesson after getting slightly turned around on my first Algonquin trip – I wish I’d spent more time practicing beforehand! Start in familiar green spaces where you can’t actually get lost. Set up a simple course between landmarks like benches, trees, or playground equipment, and practice taking bearings and following them accurately.
Try this fun exercise: pick three visible objects forming a triangle, take bearings to each, then close your eyes and spin around several times. Now use only your compass to relocate each object. It sounds silly, but this drill builds serious confidence. Urban ravines and conservation areas work perfectly for practicing contour map reading too – compare the elevation lines on a topographic map to the actual hills you’re walking. Many Ontario cities have orienteering clubs that set up navigation courses in local parks, offering excellent practice with immediate feedback. Spend a few hours mastering these skills on familiar ground, and you’ll feel infinitely more confident when you’re deep in the backcountry with no cell service.
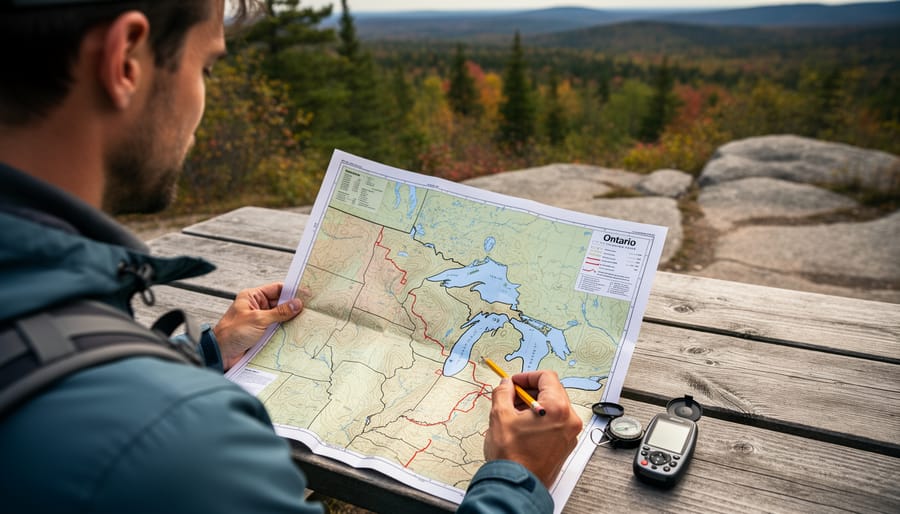
Route Planning for Ontario Backcountry Adventures
Planning your backcountry route is where the real adventure begins, and honestly, it’s one of my favorite parts of trip preparation. I’ve learned through experience that the difference between a magical journey and a grueling slog often comes down to smart route planning.
Start by being realistic about distances. A good rule of thumb for Ontario’s backcountry is to plan for about 10-12 kilometers per day if you’re carrying a full pack, though this varies dramatically based on terrain and portages. I once planned an ambitious 18-kilometer day through Killarney’s backcountry and ended up exhausted, having underestimated how those granite ridges would slow us down. Now I always pad my estimates and never feel bad about shorter days that leave time for swimming or wildlife watching.
Timing matters more than you might think. Spring in Ontario means black flies and mosquitoes, but also incredible wildflowers and fewer crowds. Summer offers the warmest water and longest days, perfect for beginners. Fall brings stunning foliage and cooler temperatures, though shorter daylight hours mean you need to adjust your daily distance targets. I aim to have camp set up with at least two hours of daylight remaining, which gives me wiggle room if I’ve misjudged the route.
Always build in contingency plans. Study your map for bail-out points where you could exit early if weather turns nasty or someone gets injured. Identify alternative campsites in case your first choice is occupied. I mark at least three potential camping spots for each night on my map, which has saved me more than once when arriving at a site to find it already taken.
Here’s an insider tip: when planning routes through parks like Algonquin or Quetico, call the park office before your trip. Rangers can share recent trail conditions, wildlife activity, and water levels that might affect portages. They once warned me about a washed-out section that wasn’t yet marked on official maps, allowing me to plan an alternative route.
Consider creating a detailed trip itinerary with waypoints, estimated arrival times, and emergency contact information. Leave this with someone reliable who knows when to alert authorities if you don’t check in. This simple step provides peace of mind and ensures help can find you if needed.
Staying Found: Navigation While You Hike
I learned this lesson the hard way on a foggy morning in Algonquin Park. I’d been hiking for twenty minutes when I realized the trail looked unfamiliar. My mistake? I’d been so focused on avoiding mud puddles that I hadn’t checked my map since leaving camp. That moment of panic taught me that navigation isn’t just about finding your way—it’s about never losing it in the first place.
The secret to staying found is treating navigation like breathing: constant and automatic. Every fifteen minutes or so, pause and play what I call the “Three Point Game.” Identify three landmarks around you, locate them on your map, and confirm your position. That distinctive rocky outcrop to your left, the creek you crossed five minutes ago, and the hill rising ahead—these become your anchors to reality. When mastering Ontario’s wilderness, this habit becomes second nature.
Keep a mental breadcrumb trail by noting distinctive features as you pass them. That lightning-struck pine, the beaver dam, or the unusual rock formation aren’t just scenery—they’re your waypoints home. I sketch quick landmarks in my notebook’s margins, adding time stamps. It sounds tedious, but it takes seconds and has saved me hours of backtracking.
Here’s an eco-friendly insider tip: instead of marking trees with flagging tape (which many parks prohibit), take photos of trail junctions with your phone’s GPS enabled. You’ll have visual references plus coordinates without leaving any trace. Some hikers build small, temporary rock cairns at confusing spots, but always dismantle them on your return trip to preserve the wilderness experience for others.
Practice handrail navigation by following linear features like ridgelines, lakeshores, or valleys. These natural guides keep you oriented without constant map checks. And when you reach major decision points—trail junctions, river crossings—stop completely. Don’t navigate while distracted. Those thirty seconds of focused attention prevent hours of wandering.
Trust your tools over your gut. That “feeling” that camp is just over the next ridge? Check your compass first.
What to Do If You Get Turned Around
First, take a deep breath. Getting momentarily turned around in the backcountry happens to even experienced navigators, and it’s completely manageable when you stay calm. Whether you’re paddling through Algonquin’s maze of waterways or hiking Killarney’s rugged trails, disorientation is normal and usually easy to fix.
The moment you suspect you’re off-route, use the STOP method. Stop moving immediately—continuing when uncertain usually makes things worse. Think about where you’ve been in the last 20-30 minutes. When did you last feel confident about your location? Observe your surroundings carefully. Look for trail markers, cairns, or familiar landmarks you might have passed. Check your map and compass with fresh eyes. Plan your next move only after you’ve processed this information.
In Ontario’s backcountry, you’ve got a crucial decision to make: stay put or backtrack. If you’re completely disoriented and it’s getting dark, staying put is often your safest bet. Make yourself visible and comfortable. However, if you’re fairly certain about your recent path and have several hours of daylight, carefully retracing your steps to your last known position often works well.
Here’s an insider tip: before you panic, check obvious mistakes first. I once spent fifteen minutes “lost” in Frontenac Provincial Park before realizing I’d been holding my map upside down. Sometimes it’s that simple.
Keep your phone charged for emergencies, carry a whistle (three short blasts signals distress), and brush up on essential survival skills before heading out. Most importantly, remember that getting confused doesn’t mean you’re in danger—it just means you need to slow down and problem-solve.
Best Ontario Parks for Practicing Navigation Skills
Ready to put your navigation skills to the test? Ontario’s parks offer incredible diversity, from gentle, forgiving terrain perfect for beginners to complex landscapes that’ll challenge even seasoned navigators. Here are my top picks for honing those backcountry wayfinding skills.
For beginners just getting comfortable with map and compass, Frontenac Provincial Park near Kingston is an absolute gem. The park features well-marked loop trails with frequent trail junctions, giving you plenty of opportunities to practice orienting your map without the anxiety of getting seriously lost. The terrain is moderately hilly with distinct features like rocky outcrops and small lakes that are easy to identify on topographic maps. Start with the shorter loops around Big Salmon Lake, where you can practice taking bearings between obvious landmarks. The park’s relatively compact size means you’re never too far from help if you need it, which really takes the pressure off while learning.
Killarney Provincial Park steps things up a notch and offers intermediate navigators a playground of granite ridges, crystal-clear lakes, and pine forests. What makes Killarney exceptional for navigation practice is the dramatic elevation changes and distinctive topography. Those white quartzite ridges aren’t just stunning photo opportunities; they’re excellent for teaching you how contour lines translate to real-world terrain. The La Cloche Silhouette Trail provides a multi-day challenge where you’ll navigate between backcountry campsites using both trail systems and off-trail lake routes. Insider tip: practice your navigation on the shorter Cranberry Bog Trail first before committing to the full Silhouette.
For advanced navigators craving a real challenge, Algonquin Park’s interior is where you’ll truly test your mettle. The park’s vast size and countless lakes create a complex navigation environment, especially when portaging between waterways. The terrain can be surprisingly subtle, with gentle rolling hills that are tricky to interpret from contour lines. Try the Petawawa River area for a mix of river navigation and backcountry hiking that demands constant map checking and route finding. The lack of obvious trail markers in many interior areas means you’ll rely heavily on compass work and terrain association.
Quetico Provincial Park offers perhaps the ultimate navigation challenge for those ready to venture into true wilderness. This remote park along the Minnesota border has minimal signage, complex waterway systems, and requires genuine backcountry navigation skills. The park’s emphasis on preserving wilderness character means you’ll navigate much like the original voyageurs did. Before tackling Quetico, make sure you’re confident with all your navigation fundamentals.
Here’s the truth: navigation skills aren’t just about finding your way from point A to point B. They’re about freedom. When you can confidently read a topographic map or follow a compass bearing through dense forest, Ontario’s incredible wilderness becomes truly yours to explore. Those hidden lakes in Killarney, the remote portages in Algonquin, the rugged trails of Quetico – they’re all waiting for you.
The best part? You don’t need to become an expert overnight. Start small. Pick a Sunday afternoon and head to a local conservation area with a simple trail map and compass. Practice taking bearings between landmarks you can see. Get comfortable with your GPS or navigation app in a low-stakes environment where getting briefly turned around just means a good story over coffee later.
As your confidence grows, graduate to day hikes in provincial parks with well-marked but challenging trails. Then maybe a short overnight trip with friends who have experience. Each adventure builds on the last, and before you know it, you’ll be planning that week-long canoe trip you’ve always dreamed about.
Remember, every expert navigator started exactly where you are now – curious, maybe a little nervous, but ready to learn. The wilderness isn’t going anywhere, and it rewards those who take the time to understand it properly. So grab that map, charge your GPS, and start exploring. Ontario’s backcountry is calling, and now you’ll know exactly how to answer.


+ There are no comments
Add yours